
When I first heard about tufting—the art of making rugs using a specialized gun that punches yarn through fabric—I was instantly intrigued. After weeks of watching mesmerizing Reels videos of people creating colorful rugs, I decided to take the plunge and headed over to Go Tufting NYC in Long Island City, Queens.
Finding the Studio
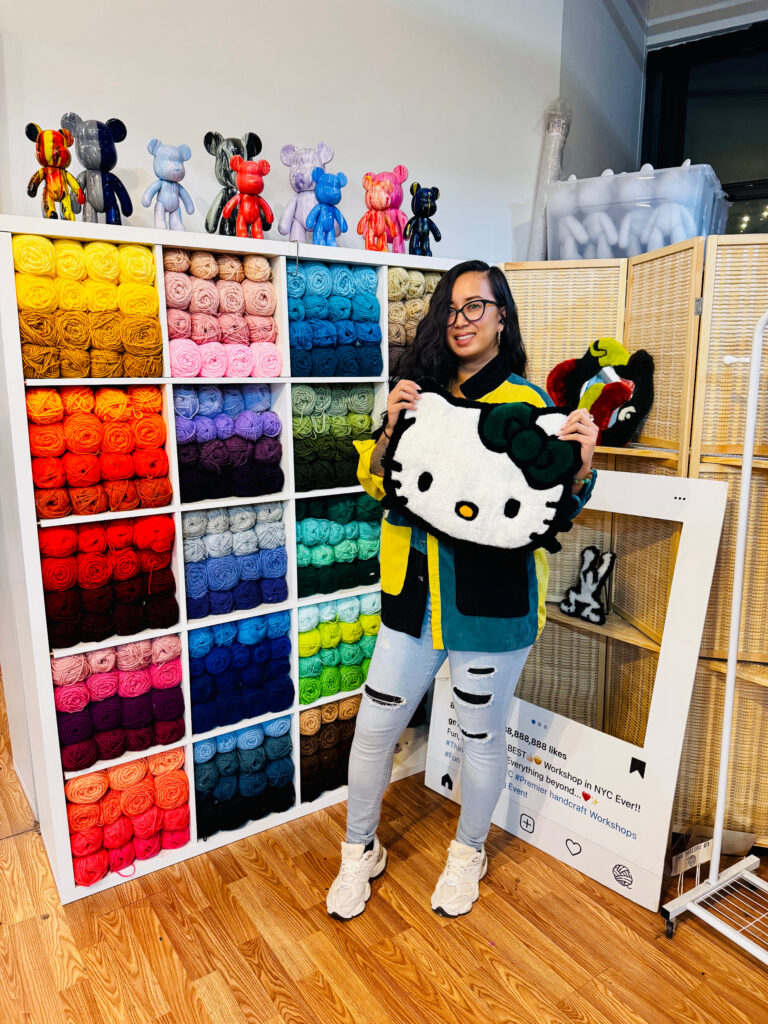
Nestled in a creative hub off Hunters Point Ave, Go Tufting NYC is a bright, welcoming space that immediately puts you in a creative mindset. The industrial-chic studio, with its large windows, houses various art tables and tufting stations where beginners and experienced artists work on their creations.
Getting Started
Upon arrival, I was greeted by my instructor who walked me through the studio space and the basics of tufting. The first step was selecting my design, which she projected onto my canvas. After settling on a simple Hello Kitty design, it was time to pick my yarn. The studio’s yarn wall is a rainbow paradise, featuring an array of colors to choose from.
The Tufting Process
The actual tufting process is both challenging and rewarding. First, my design was projected onto a stretched monk’s cloth canvas, making the sketching step a breeze. Then came the exciting part—learning to use the tufting gun. It’s essentially a power tool that pushes yarn through the fabric, creating loops or cut piles depending on your settings.
The gun is surprisingly powerful, and it took me a few practice runs on a separate array of the fabric, away from my intended design, to get comfortable with the pressure and motion needed. My instructor taught me the importance of maintaining consistent pressure and speed, and how to navigate curves and straight lines.
It truly is an art form, and as I state in my video, therapeutic af.


Learning Curves and Victories
I won’t lie—there were moments of frustration. My first few lines were wobbly, and I accidentally created a few holes in the fabric (thankfully, these are easily fixed). But there’s something incredibly satisfying about watching your design come to life, one line of yarn at a time. The methodical nature of tufting is almost meditative, and I found myself getting into a rhythm after the first hour.
Finishing Touches

After completing the tufting, there were a few other finishing steps. I trimmed uneven areas with an electric razor, making sure all the yarn was level. Then came the messy part —applying hot glue to the back of the rug to secure everything in place. Finally, I cut my creation out of the frame and added the backing fabric.
Voila! My Hello Kitty rug was complete! Even though this activity took about six hours to complete, it was truly worth it and I would definitely return to make another rug.
Yo, wjpesocasino is legit! Had some good luck there last night. Easy to navigate and the games were smooth. Definitely worth checking out. Just remember to play responsibly! Check it out here: wjpesocasino
Alright, I ventured into fabetafterlife. It’s quite a unique experience. Interface is kinda new age but with good vibes. If you’re looking something different, check it. fabetafterlife
291lodi is pretty cool. Easy to use and has a bunch of games to choose from. Definitely worth checking out if you’re trying your luck. Visit them at 291lodi
DGClubGameBet looks pretty slick. Thinking of putting a few bets down. Hopefully, luck’s on my side! Will let you know how it goes. Fingers crossed! dgclubgamebet
I’ve been playing on 123win02.net for a few days now and the experience has been positive. Quick payouts and a decent variety of games. Recommend giving it a shot 123win02.net if you’re searching for something new.
I don’t think the title of your article matches the content lol. Just kidding, mainly because I had some doubts after reading the article. https://accounts.binance.com/id/register-person?ref=UM6SMJM3
Hey guys, been playing on loverummyappbet lately and it’s pretty decent! The rummy action is smooth and I’ve had some lucky streaks. Definitely worth checking out if you’re looking for a new rummy app. Check it out here: loverummyappbet
**mitolyn**
Mitolyn is a carefully developed, plant-based formula created to help support metabolic efficiency and encourage healthy, lasting weight management.
188V có mục “Hướng dẫn cho người mới” dạng video ngắn – học cách chơi slot trong 3 phút, dễ hiểu, dễ áp dụng ngay. TONY01-26
Your point of view caught my eye and was very interesting. Thanks. I have a question for you.
Your point of view caught my eye and was very interesting. Thanks. I have a question for you. https://accounts.binance.com/en-NG/register-person?ref=YY80CKRN
downstream casino joplin mo
References:
https://kanban.xsitepool.tu-freiberg.de/s/BkZREZ15bg
Your article helped me a lot, is there any more related content? Thanks!
Your point of view caught my eye and was very interesting. Thanks. I have a question for you.
Thank you for your sharing. I am worried that I lack creative ideas. It is your article that makes me full of hope. Thank you. But, I have a question, can you help me? https://www.binance.info/el/register?ref=DB40ITMB
corticosteroids vs anabolic
References:
may22.ru
References:
Island view casino gulfport
References:
https://hi5.mn/product/%D0%BC%D3%A9%D0%BD%D1%85%D0%B1%D0%BE%D0%BB%D0%B4/
Thank you for your sharing. I am worried that I lack creative ideas. It is your article that makes me full of hope. Thank you. But, I have a question, can you help me?
References:
Is predisone and testosteone bad to take together
References:
https://noticias.upc.edu.pe/2024/06/12/upc-celebro-decima-edicion-congreso-anual-marketing-cam/
Can you be more specific about the content of your article? After reading it, I still have some doubts. Hope you can help me. https://accounts.binance.com/uk-UA/register?ref=XZNNWTW7
References:
Slot game
References:
https://graph.org/Best-Online-Casino-Trusted-Sites–Expert-Reviews-04-20
References:
Ripper casino online pokies
References:
https://graph.org/Top-Online-Casino-Games-A-Guide-to-the-Best-Real-Money-Play-04-20
References:
Make money online australia
References:
https://graph.org/Rocketplay-Casino-Australia-Full-Review-04-20
References:
Buffalo creek casino
References:
https://joo-casino.online-spielhallen.de/
References:
Microgaming casinos
References:
https://best-internet-casino.online-spielhallen.de/
References:
Hanover (Hannover)
References:
https://rio-casino-and-resort.online-spielhallen.de/
References:
Magdeburg
References:
https://lex-casino-promo-code.online-spielhallen.de/
References:
Darmstadt
References:
https://doubleu-casino-free-slots-free-coins.online-spielhallen.de/
References:
Munich (München)
References:
https://casino-spiele-online-kostenlos.online-spielhallen.de/
Thanks for sharing. I read many of your blog posts, cool, your blog is very good.
Thanks for sharing. I read many of your blog posts, cool, your blog is very good.
Your article helped me a lot, is there any more related content? Thanks!
References:
Remington park casino git.stormrain.cn
Thanks for sharing. I read many of your blog posts, cool, your blog is very good.
Đội ngũ hỗ trợ khách hàng của 888slot hoạt động 24/7 thông qua nhiều kênh liên lạc như live chat, email, và hotline. Điểm nổi bật là thời gian phản hồi trung bình chỉ 30 giây cho live chat và 2 giờ cho email – thuộc top đầu trong ngành. TONY05-28
Thanks for sharing. I read many of your blog posts, cool, your blog is very good. https://www.binance.com/register?ref=IHJUI7TF
Thanks for sharing. I read many of your blog posts, cool, your blog is very good.